Ten quick tips for teaching with (participatory) live coding (online)
By Yanina Bellini Saibene in Education Community
January 20, 2023
Live coding and participatory live coding are effective strategies for teaching programming, as they allow students to see the instructor’s thought process and problem-solving techniques in real time while programming. Moreover, it enables active teaching by allowing teachers to follow their learners’ interests, questions, and feedback. However, with the shift to virtual classrooms, we need to adapt these teaching practices to the online context.
In this blog post, I share my ten tips based on my experience teaching coding online using live coding.
What is (Participatory) live coding?
The most effective way to teach programming is live coding. Instead of presenting pre-written material, the teacher writes code in front of the class while the learners follow along, typing it in and running it as they go.
Existing tips for live coding.
I use three sources that focus on teaching in-person with live coding:
- Top Ten Tips for Participatory Live Coding in a Workshop by The Carpentries
- Ten quick tips for teaching with participatory live-coding paper in Plos Computational Biology
- The live coding session of the book Teaching Tech Together (T3)
This table shows the tips of each text side by side, matching similar tips. The number on each recommendation is the place this tip has on the original text.
| The Carpentries | Plos | T3 |
|---|---|---|
| 1. Stand up and move around the room if possible. | 3. Be seen and heard. | 4. Be Seen and Heard. 11. Face the Screen—Occasionally |
| 2. Go slowly | 1. Go slowly | 3. Take It Slow |
| 3. Mirror your learner’s environment. | 2.Mirror your learner’s environment. | 5. Mirror Your Learner’s Environment |
| 4. Use your screen wisely. | 4. Use the screen(s) wisely | 6. Use the Screen Wisely |
| 5.Use illustrations | 6. Use illustrations—Even better, draw them | 8. Draw Early, Draw Often |
| 6. Turn off notifications | 5. Avoid distractions | 9. Avoid distractions |
| 7. Stick to the lesson material. | 7. Stick to the lesson material | 10. Improvise—After You Know the Material |
| 8. Leave no learner behind. | 9. Get real-time feedback and provide immediate help, 10. Turn learners into co-instructors | 2. Ask For Predictions |
| 9. Embrace mistakes. | 8. Embrace your mistakes | 1. Embrace Your Mistakes |
| 10. Have fun! |
Many tips are either repeated in all the sources or are very similar to each other (in a different order). I took ten of these tips and added considerations for teaching online.
The tips for participatory online live coding.
1. Be seen and heard.
As learners are coding along, they must see and hear what you are doing. In an online setting, accomplishing this may require more resources in terms of technology and infrastructure, such as a stable internet connection, a widescreen, or a second screen for you and your students.
- Before starting: explain to your students how to accommodate their screen. In case they have only one screen (it is the case for most of my students), demonstrate how they can divide the screen in two vertically or horizontally. If they have two screens, show how to split the windows, one with the teacher’s screens and the other with their programming environment. You can have some pictures or videos to show how to accomplish this.
Here are beautiful example pictures from R-Ladies Chile instruction for an online workshop.
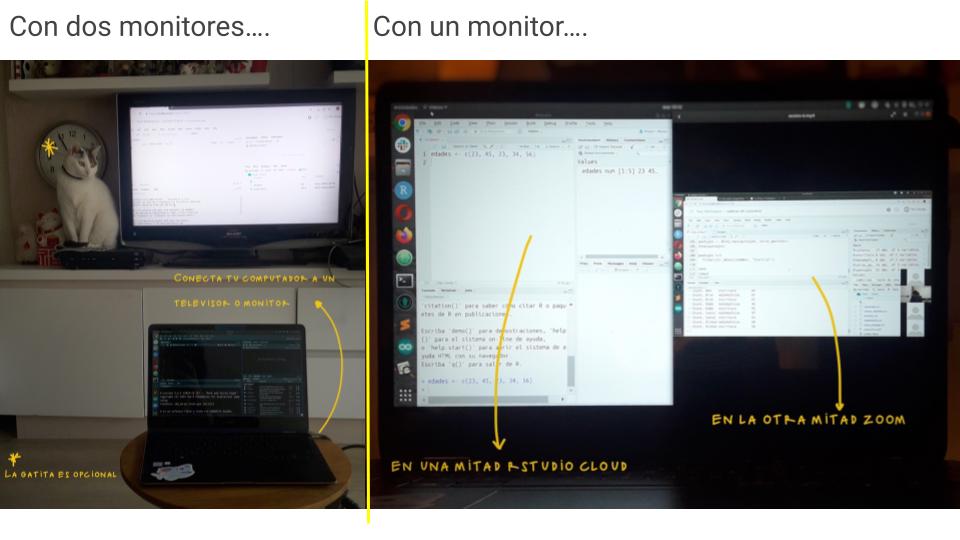
If you are teaching a long course (more than three classes), you can showcase this in the first classes and then only do it from time to time as a reminder. You can also share these videos or pictures so your students can check how to order their screens.
-
During live coding:
-
share your screen and ask before coding if they see it and if the font size is adequate. Change it if your students request it.
-
Enlarge your mouse pointer and consider using a pointer highlight ( something like this).
-
Use a program that shows your screen presses, like Screenkey. If you forget to say the shortcut you use aloud, the soft will show this on the screen for your students.
-
The white background seems better for synchronous classes. The night theme looks better for recorded videos because some students watch them at night and use small devices.
-
If you can, share your code live as you write it. Antonio Vazquez Brust explain how to do this using
ngrokand RStudio for teaching R and Elio Campitelli explain how they teach R with frictionless live coding in this video. There are other tools for other languages. Naomi Alterman shows us how to live streaming your live coding to static web pages for audience in this talk for CarpentryCon 2022.
-
-
After live coding: we must consider the possibility that some of your students may need to catch up, can’t solve an exercise, or do it inefficiently. That is why it is important to share after the class the code generated live during the class. You can copy and paste on the platform’s chat, copy and paste on the shared notes or upload to the course webpage or virtual campus. You can also share a folder in a cloud storage service. Having the final code will help your students validate their code and catch up if they can’t copy or write some part of it.
2. Go slowly, and don’t teach alone.
When you do participatory live coding, you need to teach and program at a pace that allows learners to follow along and not get left behind. It is essential in online settings if people switch between windows (the teacher demonstration and their coding) or between screens if they have more than one.
-
Start with a blank script or notebook to ensure you will explain everything they need for the code to work.
-
Explain the goal of the code you will develop and write it down in the notebook or as a comment in the script. It helps us focus on what we want and the reasoning behind coding for that goal.
-
Explain every step you made. Say out loud what you are doing while you do it for every command you type, every word of code you write, and every menu item or website button you click. Then, point to the command and its output on the screen and go through it again to allow students to check what they did.
-
Mention the line number of the code you are referring to.
-
Narrate your keystrokes (and the combinations), especially when you need to use tricky punctuation (“square brackets”, “round brackets”, etc)
-
When an IDE auto-completes things, it’s useful to point it out the first few times (and say how you use or activate that feature) since it may be the first time some students have seen it. For example, RStudio IDE has IntelliSense. You can stop and explain what is showing and how it changes when you write, then you need to use a tab (on windows) to complete the word, which I also explain, so they don’t think I write so fast. Then the IDE shows a summary of help for the function. I also stop there and read that help and explain the different parts of the help so they can recognize parameters, default values, etc.
-
If the output of your command or code makes what you just typed disappear from view, scroll back up so learners can see it again.
-
Don’t use many keyboard shortcuts, especially at the beginning. If you use a keyboard shortcut, say it aloud the first time you do. Explain an alternative to the shortcut (for example, using menus). You can remember your students what shortcuts you are using from time to time (in case you don’t use a program that shows your screen presses).
-
Your helper should be watching the chat, helping troubleshoot and solve students‘ problems, copying links or pieces of code if needed, and letting you know when something needs to be clarified, re-explained, or shown one more time.
-
If you are teaching alone, let students know when you will watch the chat to help them. Be clear about how they can participate and ask questions (using the chat, unmuting them, using a nonverbal expression, shared notes, etc.) and how you will answer.
-
Use the chat to copy and paste students' code or errors. Be careful of treacherous chat systems that can mangle your code. Straight quotes can be transformed into typographical quotes, and character limits might chop off parts of the code, etc. A share note document is also a good place to paste your code or students' code and errors.
3. Mirror your learner’s environment.
If learners have to work in a different environment than you, they need to make a mental effort that does not contribute to learning. The cognitive psychological theory calls this “extraneous cognitive load.” Try to create an environment as similar as possible to what your learners have. If they are beginners, it is a high chance they have the default configuration of the IDE or software you are going to use.
A cloud-based solution is the best alternative to ensure you and your students have the same setup. Some of these tools allow you to include all the software, packages, and data you need avoiding installation problems and the consequent frustration.
When I teach SQL, I use SQL Lite Online. When I teach R, I use Posit Cloud in the first class, and then we use the last part of that class to troubleshoot installation issues on students' computers. I also have a Posit Cloud project as a backup in case some students can’t install everything on their computers. The cost of the tool can be an issue.
4. Use the screen(s) wisely.
We already mention you need to show your students how to accommodate their screen to see you best. Using live coding, you must also tidy your screen(s) to teach.
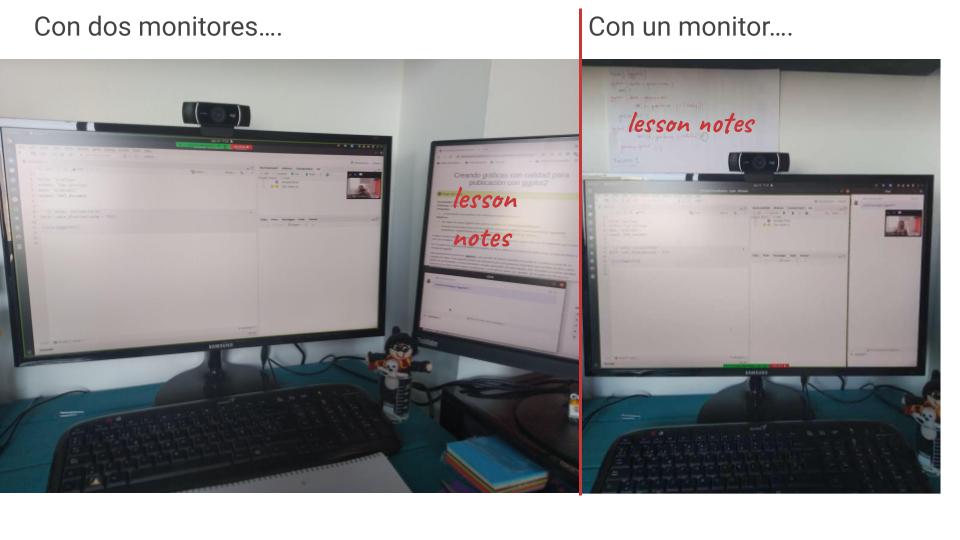
The best solution is to use two devices or screens when teaching: one to share with students and another to see students' notes and videos, lesson notes, and the chat window.
If you don’t have two screens, then only share with your students the windows or panels you want them to see. You can have your lesson notes printed on paper.
Here is a nice example of desktop configuration by Paola Corrales with one or two screens.
Enlarge the panel of the screen you need to show. For example, if you need to show the code enlarge the script windows. If you need to show a result, enlarge the console panel, and so forth.
One benefit of online teaching is that when people run into problems, they can screen share, and we can solve the problem together. If your student feels comfortable, allowing them to share their screen to solve problems with the whole class is an excellent learning experience. They can also share their screen to demonstrate something they did.
5. Avoid distractions.
Turn off notifications on the devices you are using and on your phone. Seeing notifications flash by on the screen distracts you and the learners. Open only the software, apps, and web pages you will need to use during the lesson. Close any other applications, including email and social media. Consider what desktop image and screensaver you use because you will end up sharing them with the class and on the video if you record the lesson.
It is important your assistant work to sort out the queries and problems that students may have during class so that interruptions are orderly and serve the lesson rather than cut off its flow. Also, remember to give instructions on how to participate, how to ask questions, and use what tools before starting your live demonstration ( see tip number 1).
Finally, ask your student to reduce the number of distractions on their devices, such as notifications, emails, and other browser tabs they may have open while the class is taking place. You can’t control what they do, but making a friendly request can help some of them to close these distractors.
6. Stick to the lesson material.
Stick fairly closely to the lesson plan, and practicing teaching your live coding technique is important, especially if it is the first time you teach the lesson. Add notes to your printouts of the lesson material, or have them easily available on the second screen or device (tablet or laptop), if you use one.
Once you are more familiar with the material, you can and should start improvising based on the backgrounds of your learners, their questions in class, and what you find most interesting.
If a question or a “what if?” comes, but you don’t want to disrupt the flow of the lesson, or you know it will take more time than the one you have, or you need some time to sort through, ask learners to add them to a shared online document or ask your helper to collect them. Then, you can think about these while learners are doing exercises and answer them afterward, or the next class.
7. Turn learners into co-instructors.
During participatory live coding, learners are actively coding along with the instructor. This can be a challenge in online teaching and even more with beginners.
One way to address this issue is to use the breakout rooms offered by Zoom or Meet (even in their free version). Peer-to-peer instruction is the most effective scalable teaching practice we know. We can use it for reinforce the live coding lesson.
Zoom’s breakout rooms make this relatively easy to execute online: it takes 15 to 30 seconds to get everyone into the rooms. In a class of forty, one or two will initially struggle, but it helps keep your students well-motivated and attentive.
I use this dynamic with beginners and live coding:
- I lived code between 10 and 20 minutes.
- I send them to the breakout room in groups of 3 or 4 students (bigger groups create subgroups, or someone doesn’t participate) to solve an exercise.
- The exercise is the same or very similar to what we try to do during my live coding.
- Before going to the breakout room, I give the instructions: how much time they have to solve the exercise (between 10 to 20 minutes), a student shares a screen, and they program together to solve it.
- I take the time (now the videoconference tool does that for me), and when time is up, they go back to the common room, and we talk about how it went, what problems and questions they have. We go over these details. It is a good time to let them share the screen to see their problems or solutions, especially if they solved the exercise differently.
This strategy allows them to reinforce the learning by doing during the live coding and then one more time in groups.
You can use different types of exercises for the work in groups, like fill-in-the-blank, Parson problems, interactive tutorials that provide different types of scaffolding.
8. Get real-time feedback and provide immediate help.
Doing live coding online can be difficult to know whether people are following along or they aren’t able to code due to ongoing issues that haven’t been fixed.
One way to check with your learners is to give a different way to indicate their status to us. When we teach in person, we use colored sticky notes. Some options for teaching online are:
-
Non-verbal feedback in videoconferencing platforms appears as the first choice to replace colored sticky notes. If we use Zoom, a person can be asked to mark with a green check mark if they are finished or with a red mark in case they are stuck. As with the sticky notes, these marks do not come off by themselves, so it is necessary to ask the person to remove them if they have already solved the problem or move on to another exercise.
-
Created a table in the collaborative document (using HackMD or google docs) with all the participants' names. Ask them to put a green check or red cross to check if they are on track. You can check in on someone who doesn’t fill something in.
-
In zoom, the other reactions with emojis are useful for a quick general status because they also show us the number of each emoji in the list of participants. But these emojis clean after a while so you can miss some information. For the same purpose, we can also ask them to write in the chat when they finish a task. Although it can be a lot of information together in groups of more than 20 people and complicated to determine who did not answer.
-
Other tools, such as surveys or a parallel Slack channel, can be used, but adding more tools to the synchronous class, especially if it is a new tool, is a cognitive load that we must consider.
-
Some topics allow you to add in the code an element of randomness that will give different results on different machines or environments and you can ask your students if their results are the same as yours. When I teach network graphs, the algorithm is nondeterministic so the graph my students get is usually different from mine, many times I don’t need to ask, the chat is flooded with messages saying that their graphs are different. That way you can know they are following you.
One more time, don’t teach alone is a good strategy for this tip. Helpers' main role is to ensure learners do not fall behind due to, for example, technical issues. Sometimes is a good idea to create a breakout room for solving tech issues where the student can go with a helper and solve the problem. Helpers should keep an eye out for the shared document(s), the emojis or the Slack channel. indicating a learner signaling for help.
9. Use illustrations—Even better, draw them.
Diagrams and concept maps may help learners understand the lesson’s stages and organize the material. What can work well is when you, as an instructor, generate the illustrations as you progress through the material. There are several tools to do this online (Miro, Jamboard, Whiteboard.fi, draw.io, and excalidraw, among others). You can use it with your mouse or a tablet (I use the Wacom One, which is great).
You can build up diagrams, making them increasingly complex in parallel with the material you teach. Presenting complementary information using visual and verbal representations helps to learn (so-called “dual coding”).
Drawing the diagrams together with the students is also a good idea. For example, I used to draw a concept map for flow control code with my students to talk about essential concepts before doing the live coding. I also draw a map of the execution order of a SQL sentence to explain the outcome of a query or why we should use one function and not another after the live coding.
Some tools allow you to write and draw over your shared screen. This can be helpful to mark part of the code and annotate the value of a variable while you execute a piece of code or the steps and order of execution of a sentence.
10. Embrace your mistakes.
Even if you know your lesson well and follow it, it is very likely that you will make mistakes while demonstrating how to program live. Making mistakes is often the biggest fear of teachers using this technique. It’s okay that it happens (since it’s what happens in real life when we program), and it can be an excellent opportunity to learn how to debug. This way of dealing with mistakes is called “positive error framing,” It is beneficial for learning.
When an error occurs, stop, read it aloud, and explain how you determined what happened. Mark which part of the error text gives you a clue that helps you diagnose and resolve it. Then go back to the code and show what element(s) in the code throw the error. It helps when you clarify what every piece of the code is doing by creating new examples showing why an error is thrown in one situation but not in another. You can also involve the learners in problem-solving by asking them what they think went wrong and how to fix it.
If you have time, use the error to do a “live searching.” In this lesson, you show how to search for an error on the internet, refine that search, read the results, and determine which one is the closest to your problem. Here you can teach how to read the help and Stack Overflow’s questions and answers.
Also, as mentioned in previous points, if a student has an error, you can ask them to share their screen, and the whole class works together to solve it using these strategies.
Once you have given a lesson several times, you’re unlikely to make anything other than basic typing mistakes (which can still be informative). You can try to remember past mistakes and make them deliberately, but that often feels forced. An alternative approach is twitch coding: ask learners one by one to tell you what to type next. This is pretty much guaranteed to get you into some kind of trouble.
Conclusions.
Participatory live coding is used successfully by thousands of instructors worldwide, teaching programming, different tools, and software. As with any other teaching strategy, it takes practice but is very useful for better results for you and your students.
Here are two example videos contrasting online live coding done poorly (in Spanish) and online live coding done well (in Spanish).
In this CarpentryCon 2022 Lightning Talks: Managing Real Estate: Best practices to teach live coding, Jennifer Stubbs made an excellent summary of advice for live coding.
Acknowledgements.
Thanks to Paola Corrales and Elio Campitelli for their comments on an early draft of this blog post, and Shern Tee for feedback on the blog post.
Thanks to Rainier Barrett, Lieke de Boer, Kristin Lee, Jonathan Wheeler, and Jannetta Steyn for discussing the logistic of live coding online during our training for becoming The Carpentries Trainers.